Import Exotel Phone Numbers to OmniDimension
Learn how to seamlessly integrate your Exotel phone numbers with OmniDimension and set up intelligent call flows for your AI agents. This guide will walk you through the complete process step-by-step.
1. Overview
This guide will help you import your Exotel phone numbers into OmniDimension so your AI agents can handle incoming calls. You'll learn how to set up the necessary call flows in Exotel and then import them into OmniDimension for seamless integration.
2. What You'll Need
Before you can import an Exotel phone number, you need to complete these steps in your Exotel account:
- Create an account on exotel.com
- Complete KYC (Know Your Customer) verification by submitting required documents
- Purchase an Exophone number from your Exotel dashboard
- Create a call flow for your Exophone number (to configure check step 4)
- Attach the call flow to your phone number
3. Required Credentials from Exotel
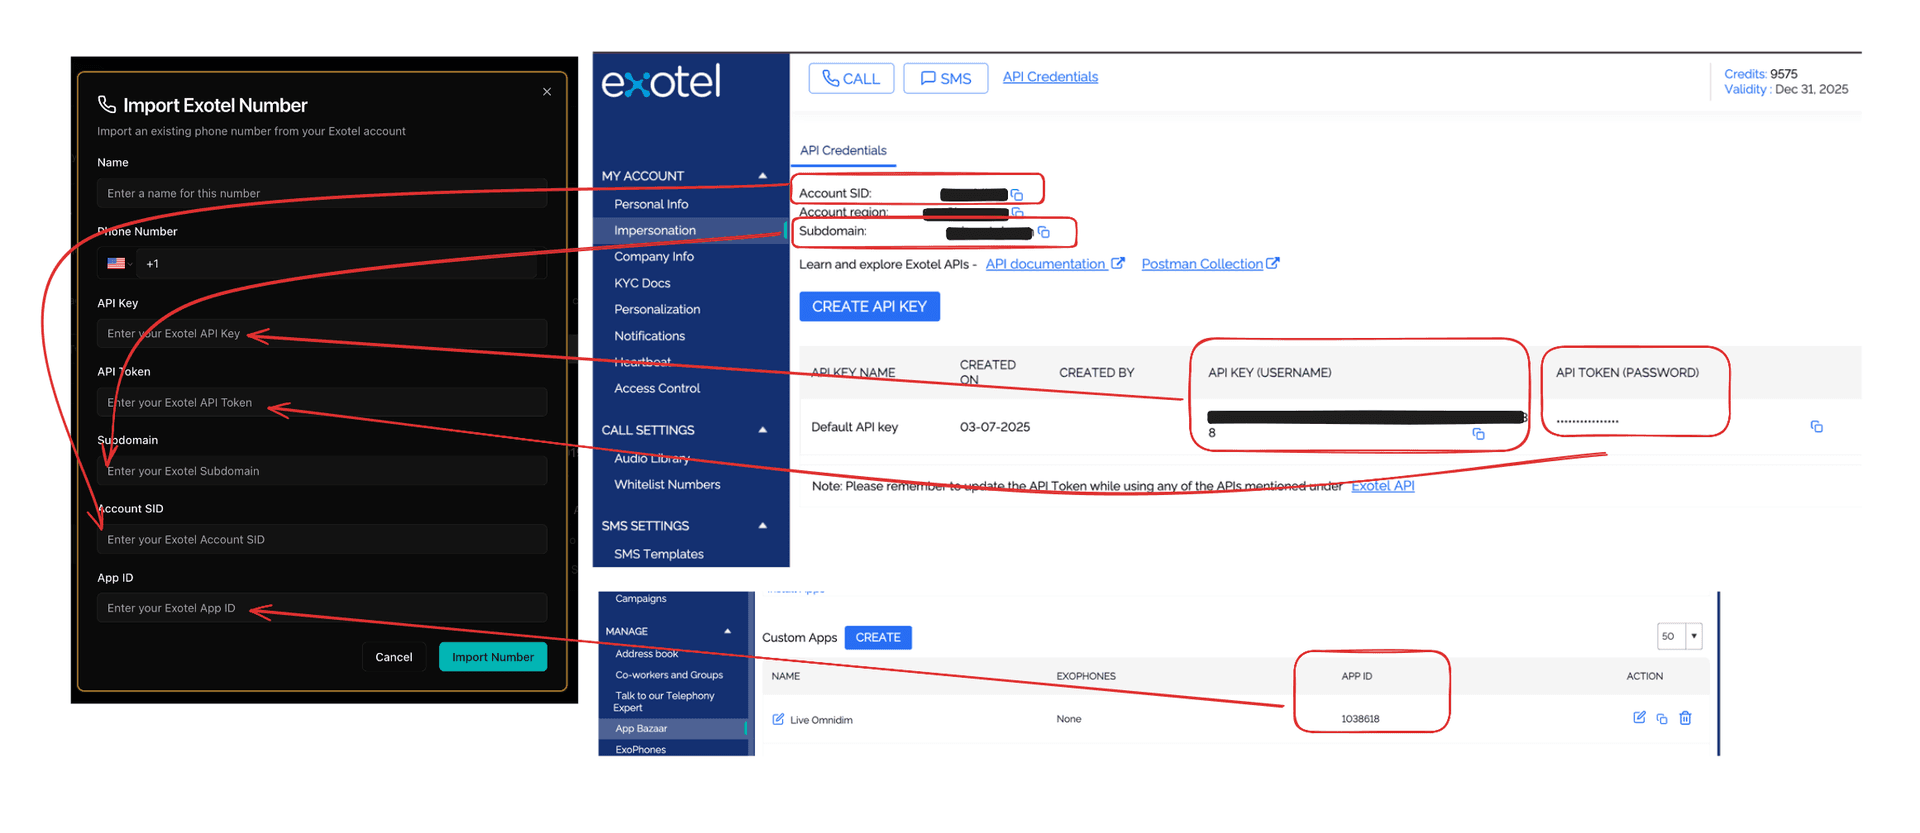
After completing the prerequisites, you'll need to collect these credentials from your Exotel dashboard. You can find these in the API Credentials section:
- Exotel API Key - Your authentication key for API access
- Exotel API Token - Your secure access token
- Exotel Subdomain - Your account's subdomain (e.g., yourcompany.exotel.com)
- Exotel Account SID - Your unique account identifier
- Exotel Phone Number - The phone number you want to import
- Exotel App ID - The call flow ID (you'll get this after creating your call flow)
4. Setting Up Call Flow in Exotel
This is the most important part of the process. You'll need to create a call flow in Exotel that connects to OmniDimension. Follow these steps carefully:
4.1 Access App Builder
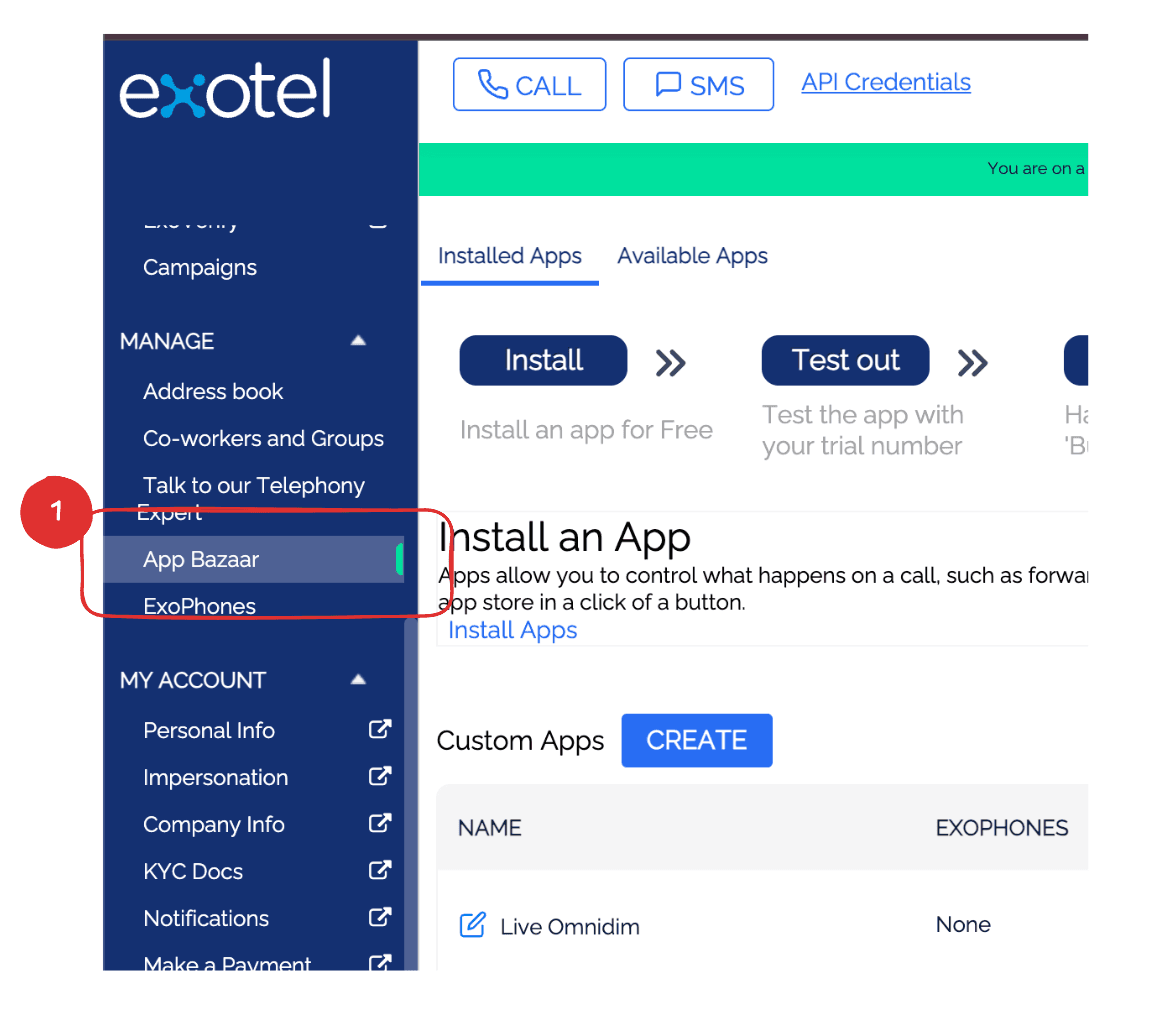
In your Exotel dashboard, go to the side menu and click on 'App Builder'.
Navigate to App Builder in the side menu
4.2 Create New App
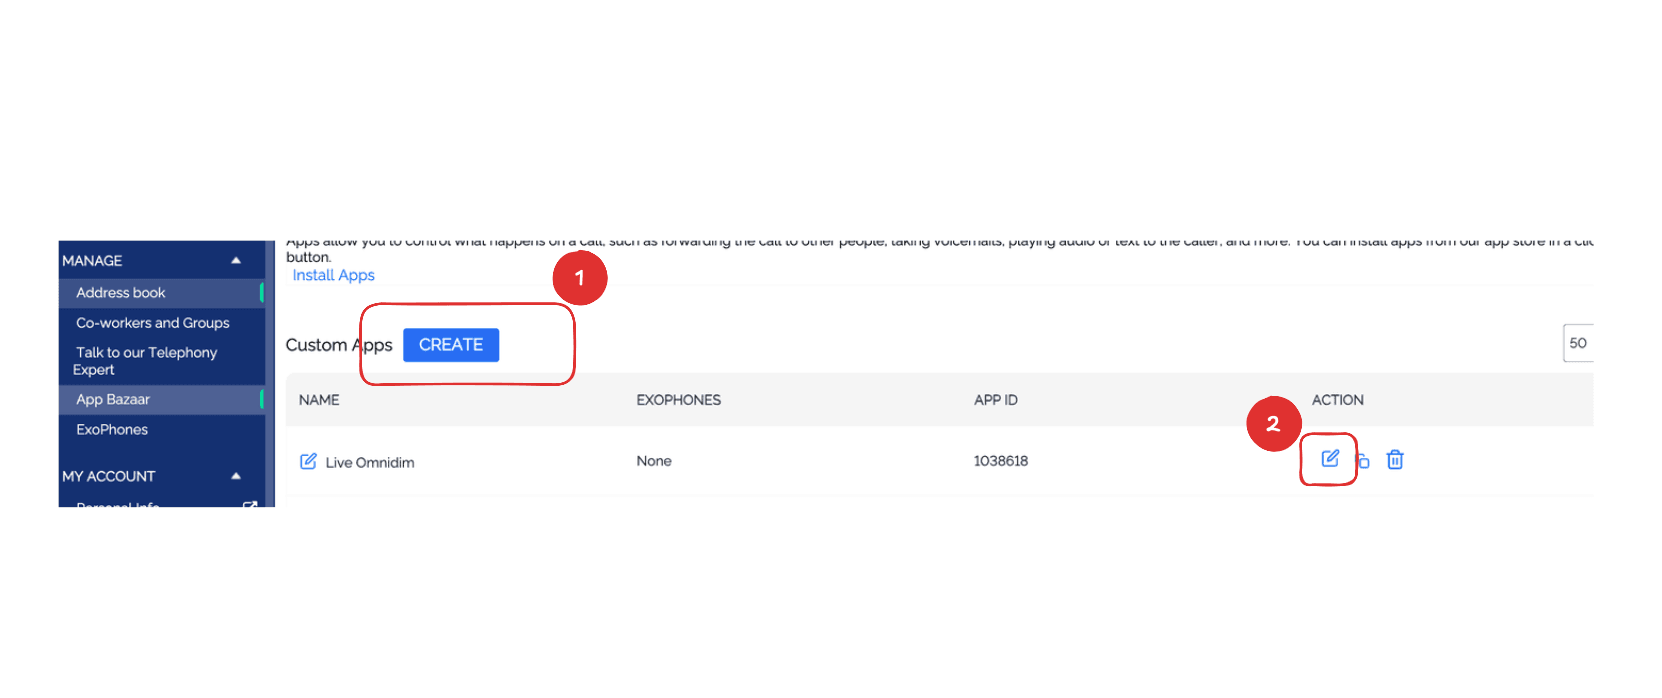
Click on 'Create New App' to start building your call flow.
Click Create New App button
4.3 Add Voicebot Applet for Call Coming
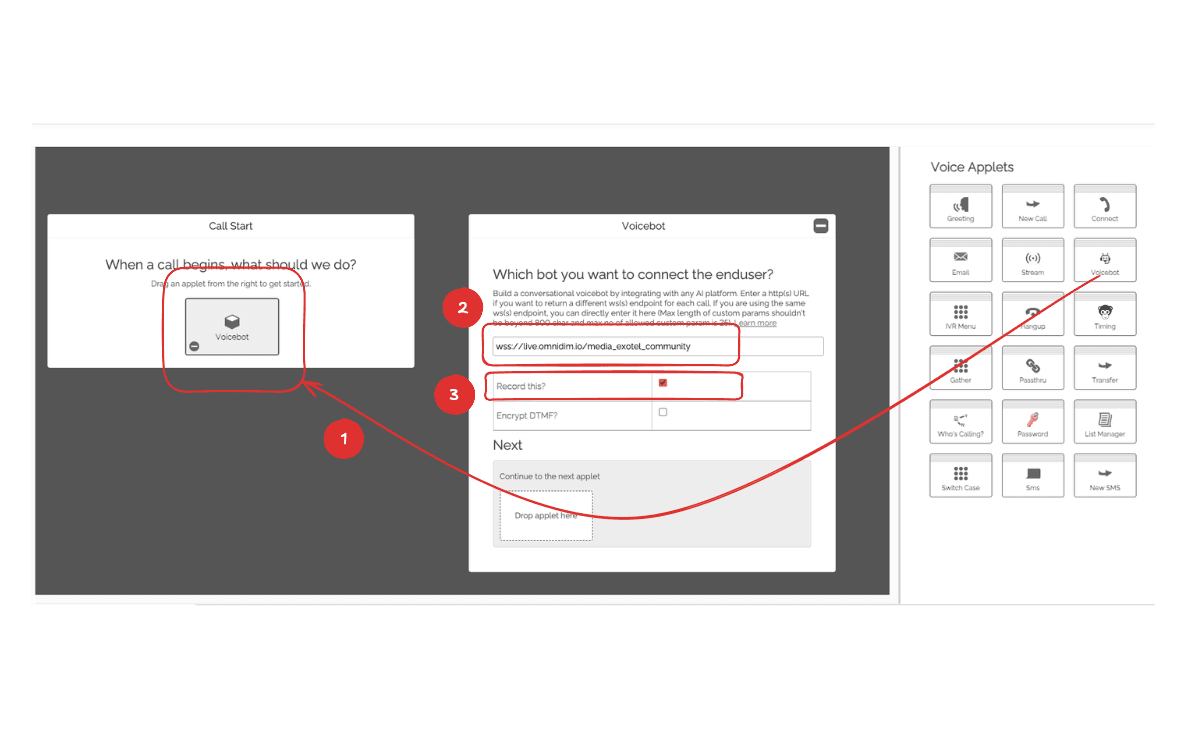
On the 'Call Comes' block, drag a 'Voicebot' applet from the right sidebar. In the URL field, enter: wss://live.omnidim.io/media_exotel_community and also turn recording ON.
Drag Voicebot applet and add the WS URL
4.4 Add Second Passthru Applet
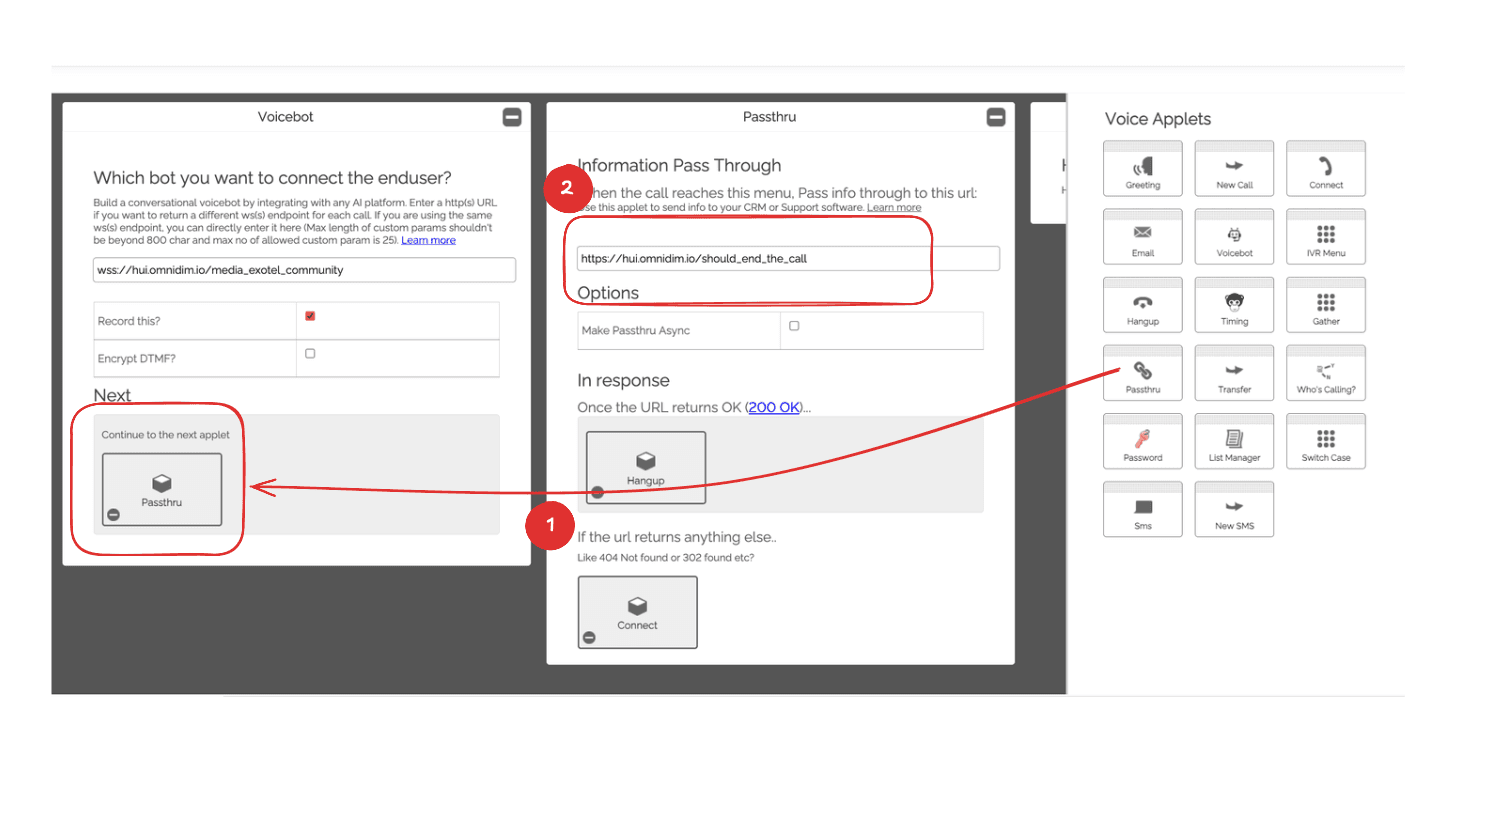
On the voicebot applet's next section, drag another 'Passthru' applet. In the URL field, enter: https://live.omnidim.io/should_end_the_call
Add second passthru applet
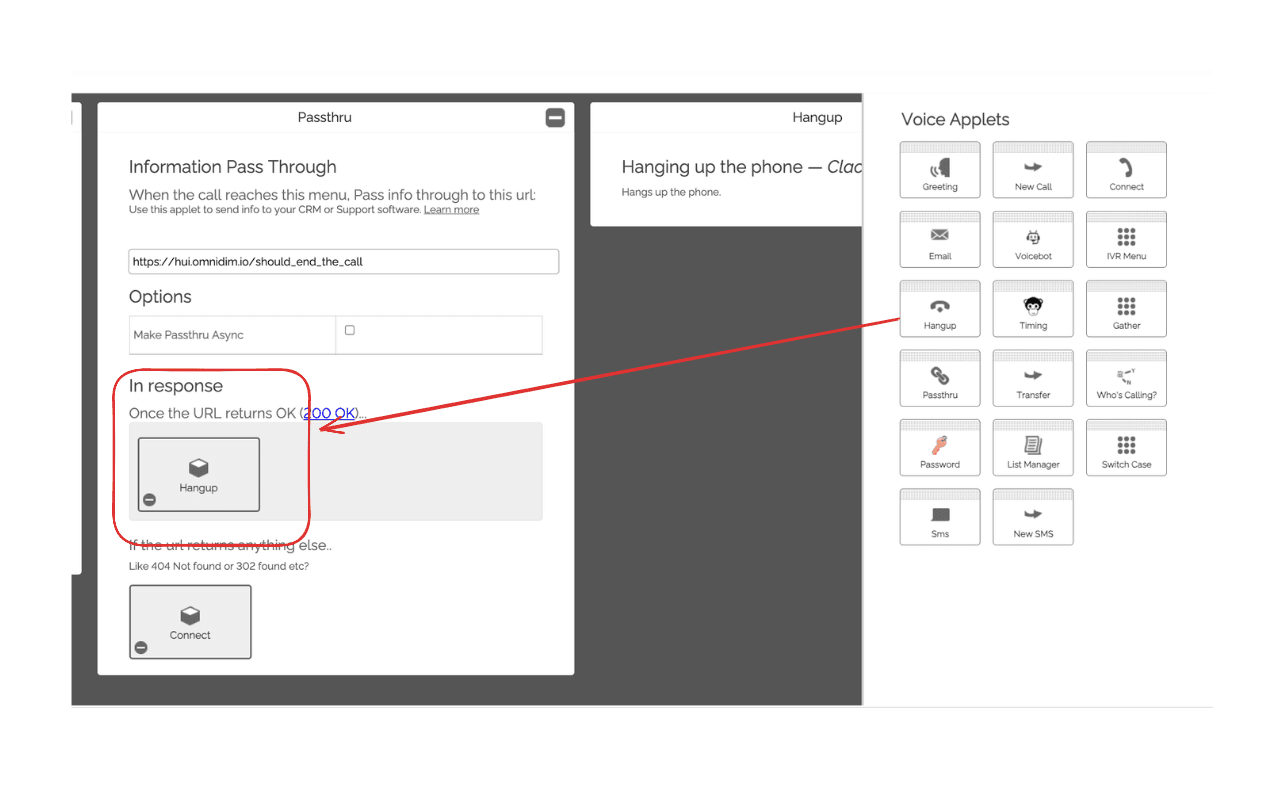
4.5 Add Hangup on 200 Response
In the 200 response of the second passthru applet, drag a 'Hangup' applet to end the call when needed.
Add hangup applet on 200 response
4.6 Add Connect on 302 Response
In the 302 response of the second passthru applet, drag a 'Connect' applet for call transfers.
Add connect applet on 302 response
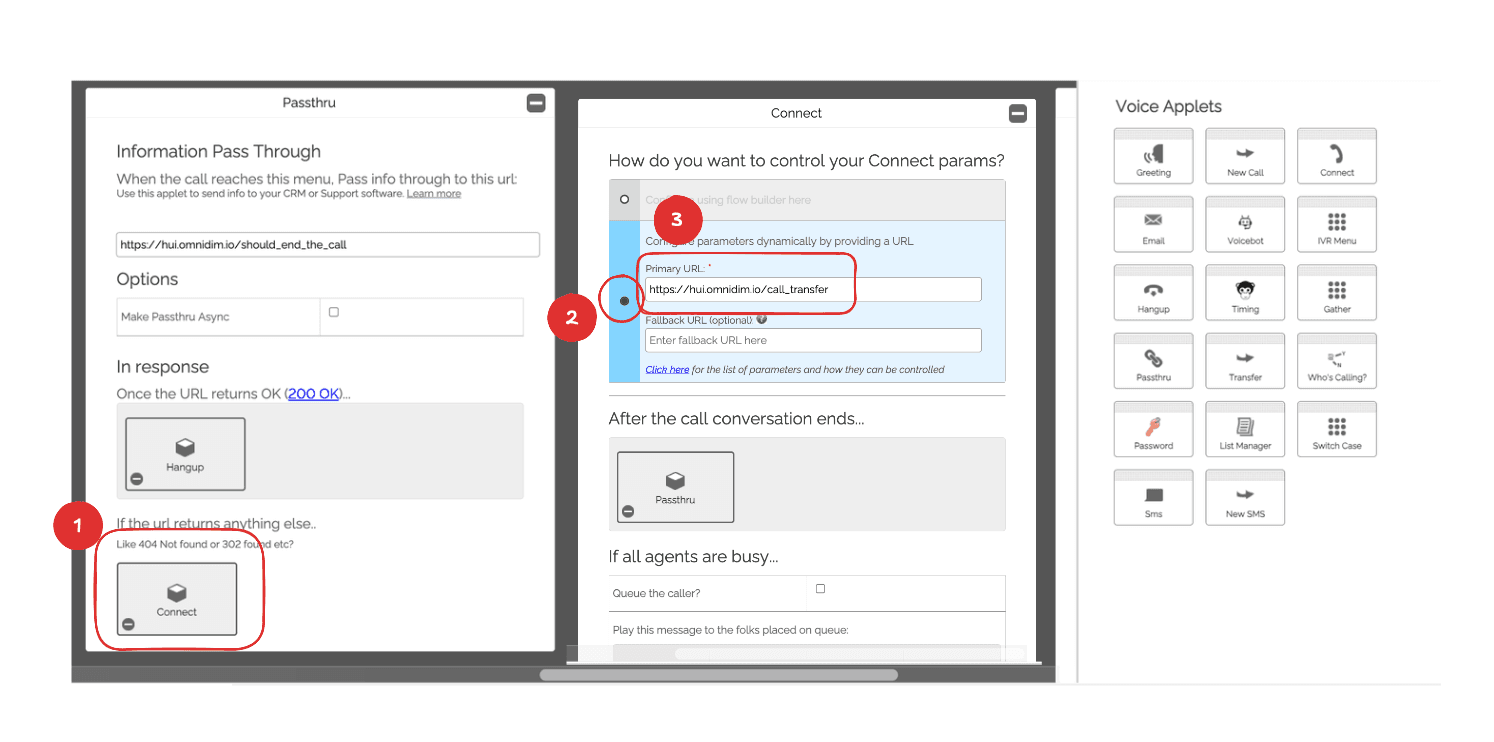
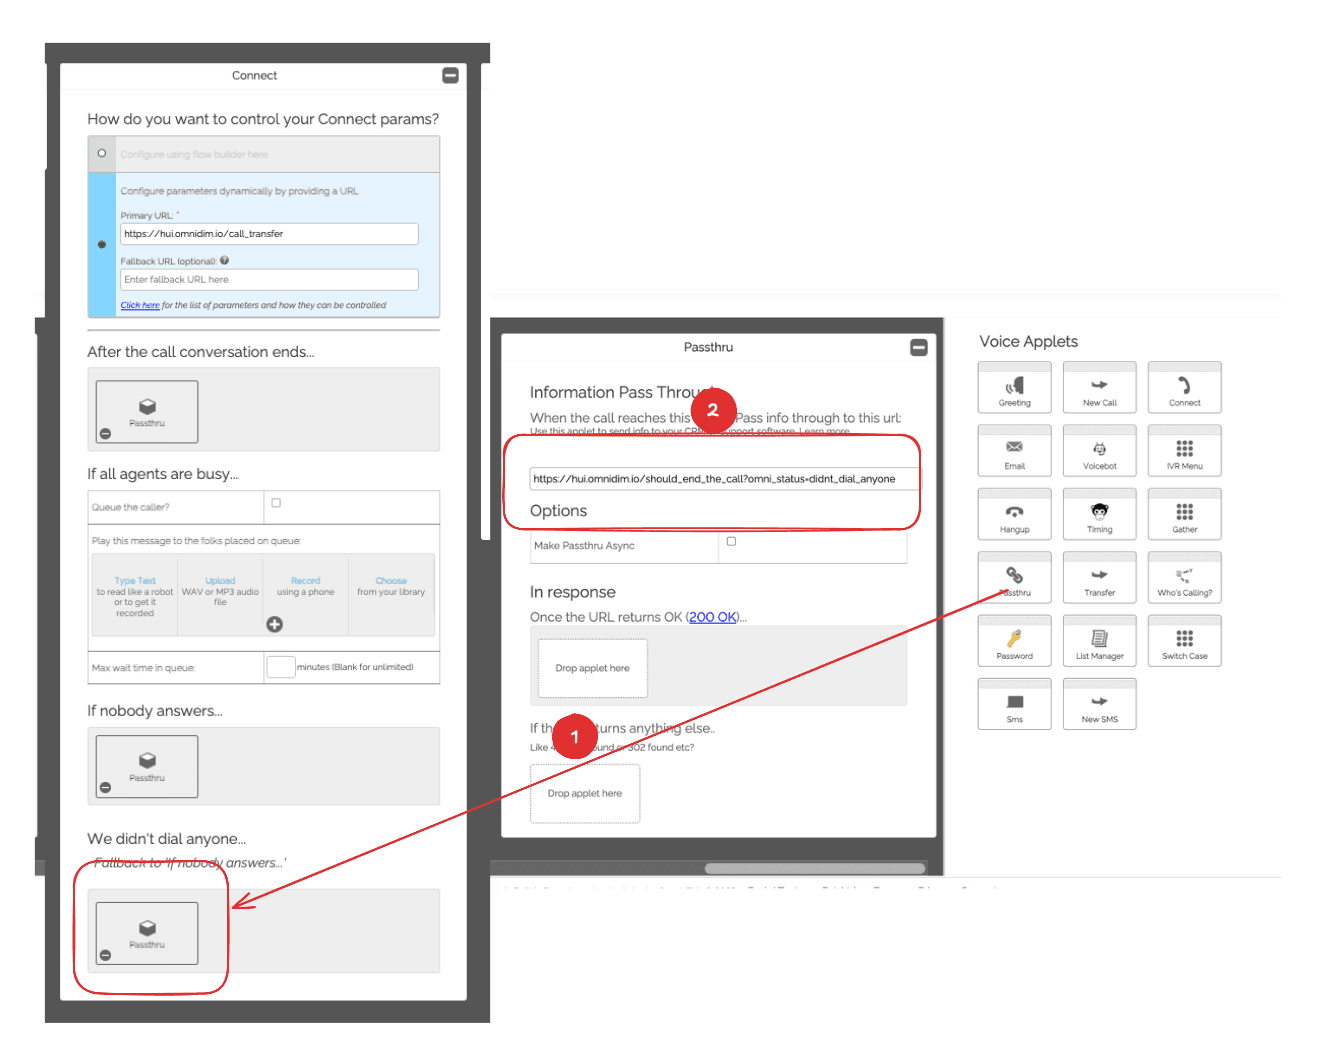
4.7 Configure Connect Applet
In the connect applet, select 'Primary URL' and enter: https://live.omnidim.io/call_transfer
Configure connect applet with URL

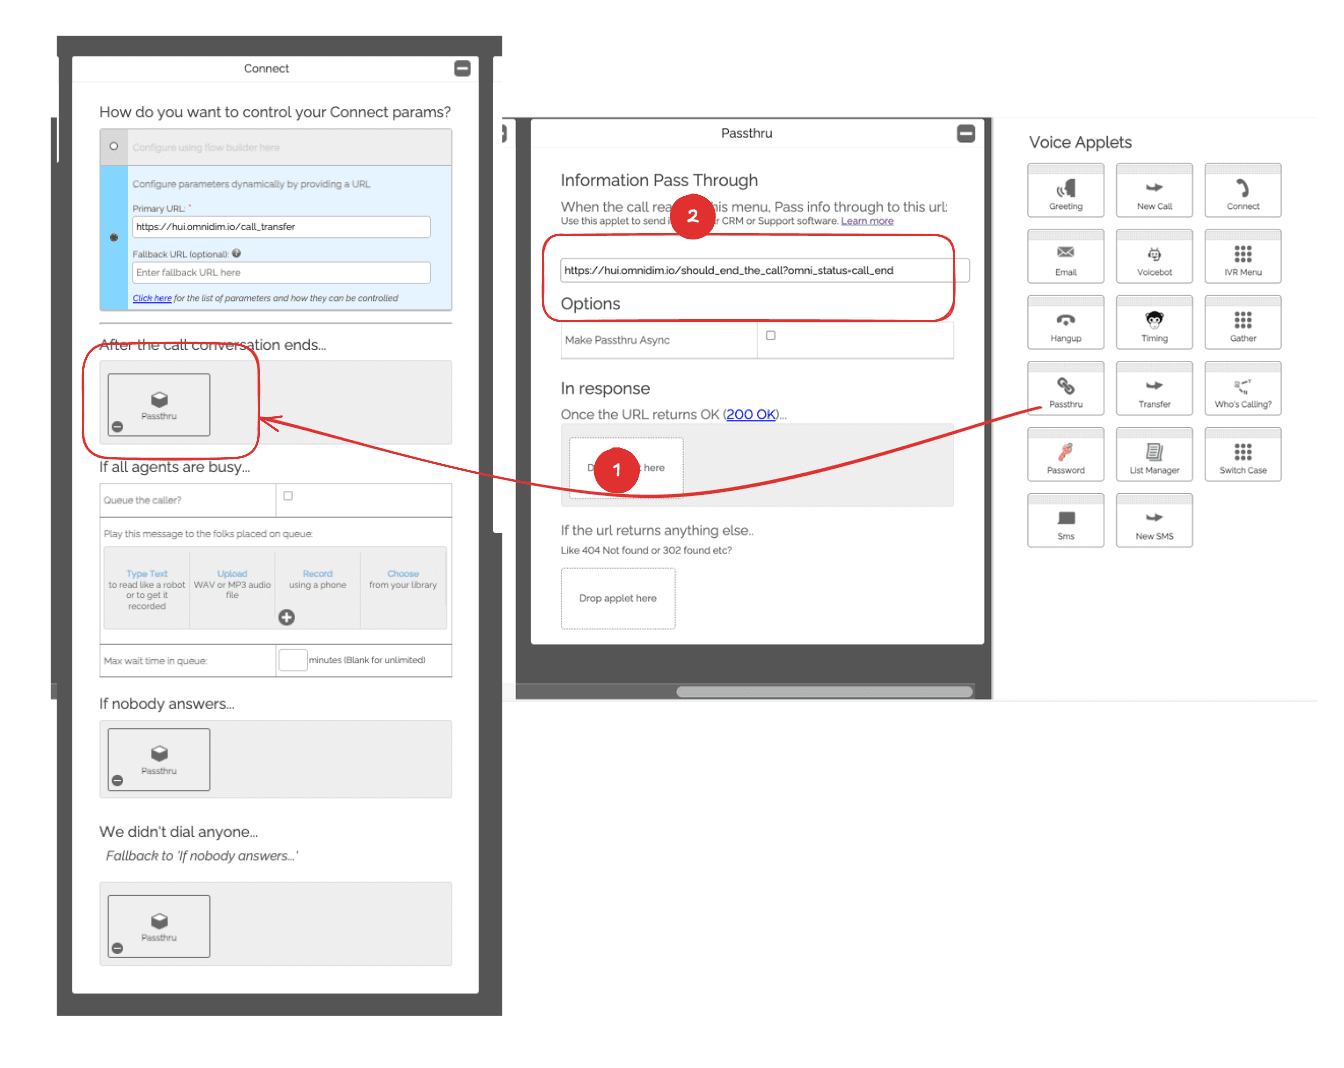
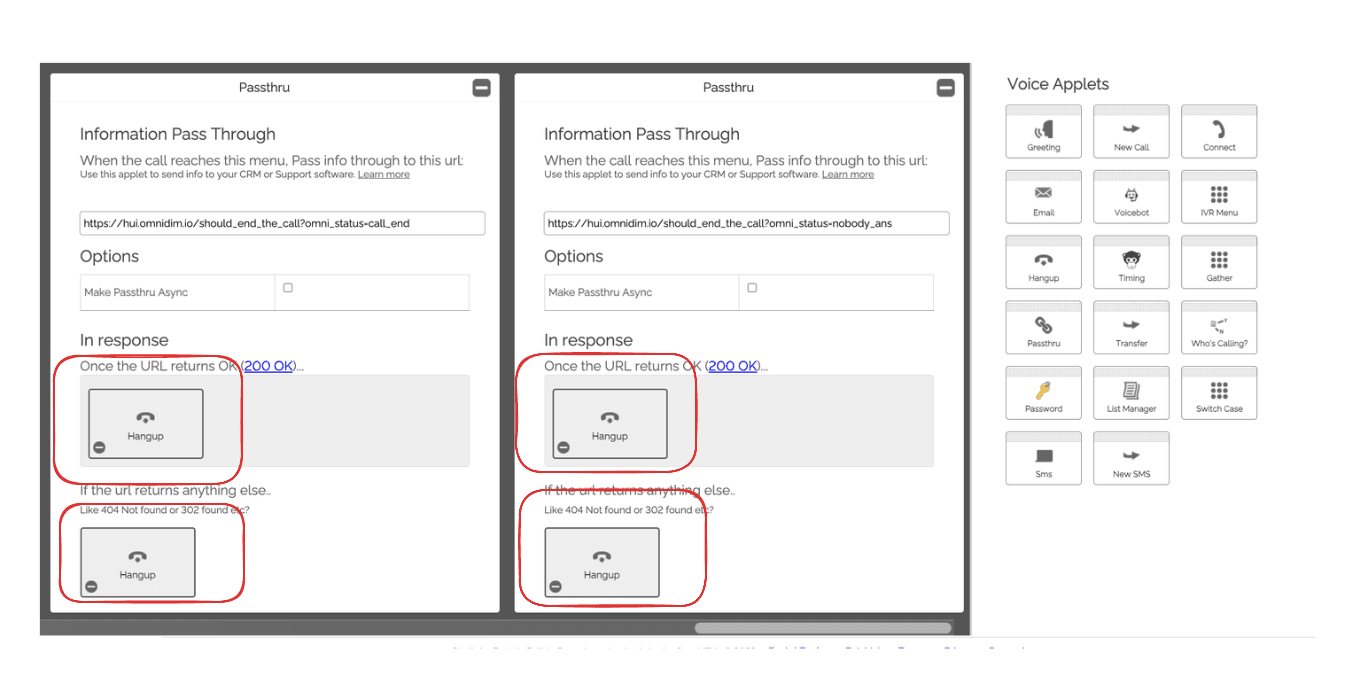
4.8 Add Passthru for Call End
For the 'After the call conversation ends' option, add a passthru applet with URL: https://live.omnidim.io/should_end_the_call?omni_status=call_end
Add passthru for call end scenario
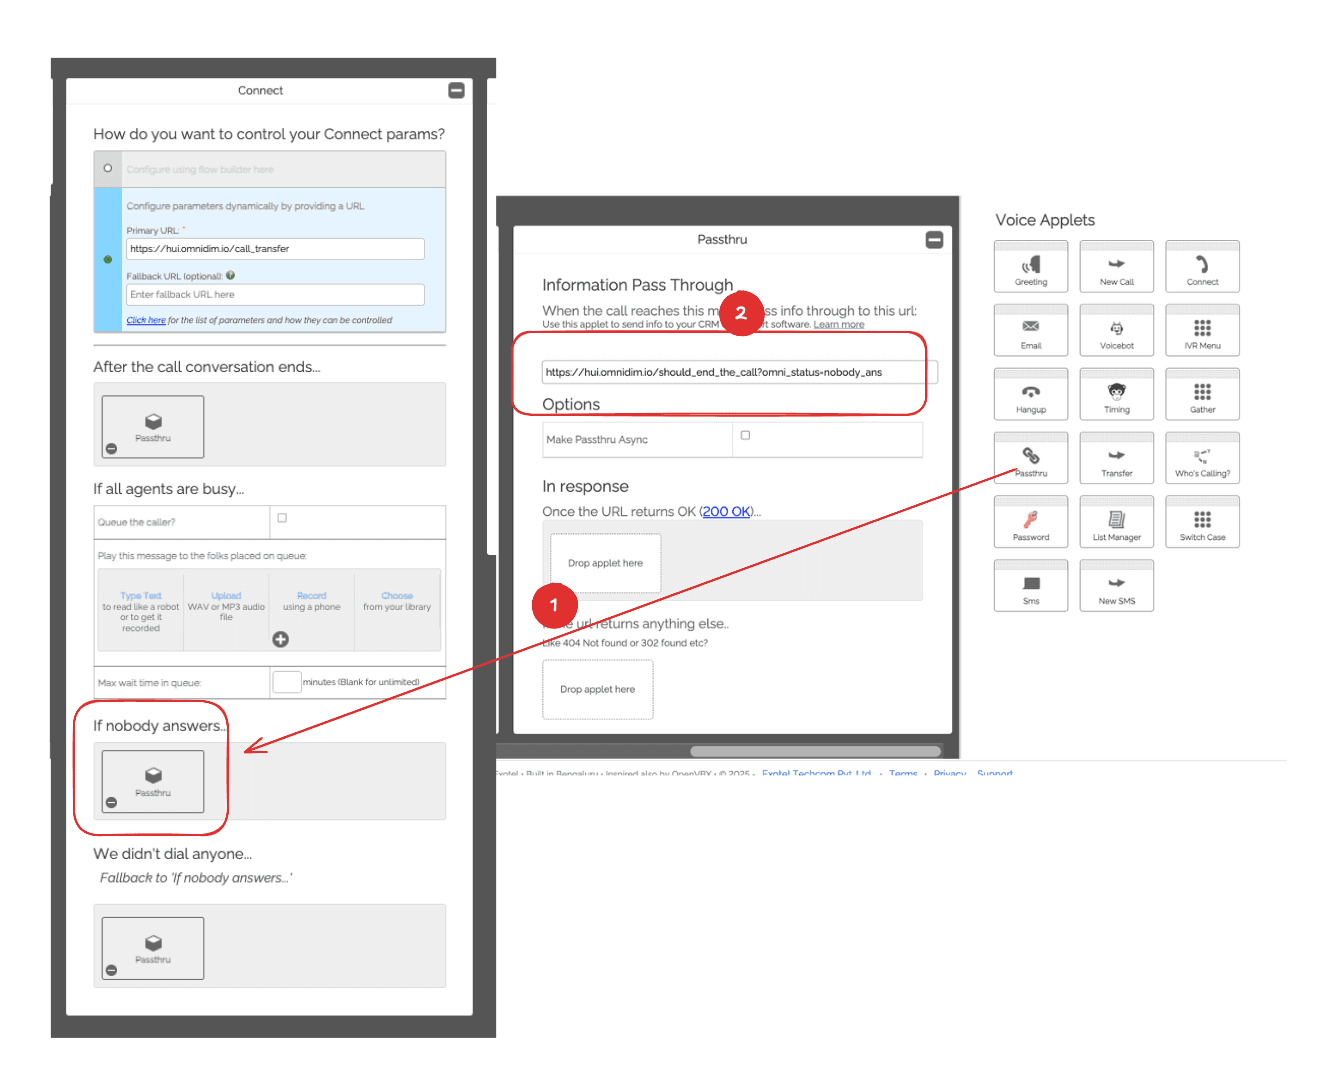
4.9 Add Passthru for No Answer
For the 'If nobody answers' option, add a passthru applet with URL: https://live.omnidim.io/should_end_the_call?omni_status=nobody_ans
Add passthru for no answer scenario
4.10 Add Passthru for No Dial
For the 'We didn't dial anyone' option, add a passthru applet with URL: https://live.omnidim.io/should_end_the_call?omni_status=didnt_dial_anyone
Add passthru for no dial scenario
4.11 Add Hangup Applets
On all the passthru applets you just created, add a 'Hangup' applet in both 200 and 302 responses to ensure calls end properly.
Add hangup applets to all passthru responses
4.12 Save Your Call Flow
Click 'Save' to save your call flow configuration and close the flow builder. Make sure to note down the App ID (call flow ID) as you'll need it for the import process.
Save your call flow configuration

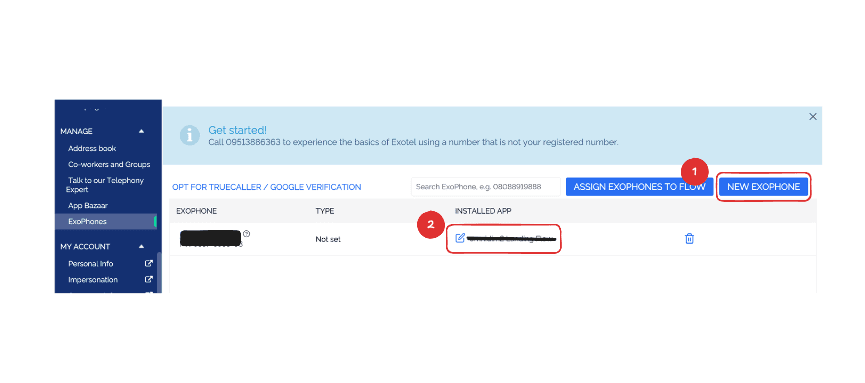
4.13 Attach Call Flow with you Exophone number
go to Exophone buy a number and attach the call flow you just created, Make sure to note down the Phone Number as you'll need it for the import process.
Attach call flow with your Exophone number
5. Important Notes About Call Flow Setup
Keep these important points in mind while setting up your call flow:
- The Voicebot applet will only be visible after you complete KYC verification
- If you don't see the Voicebot applet after KYC, contact Exotel support
- Make sure all URLs are entered exactly as shown (no extra spaces or characters)
- Test your call flow in Exotel before importing to OmniDimension
- Save your App ID (call flow ID) - you'll need it for the import process
6. Import to OmniDimension
Now that your call flow is set up in Exotel, follow these steps to import your phone number into OmniDimension:
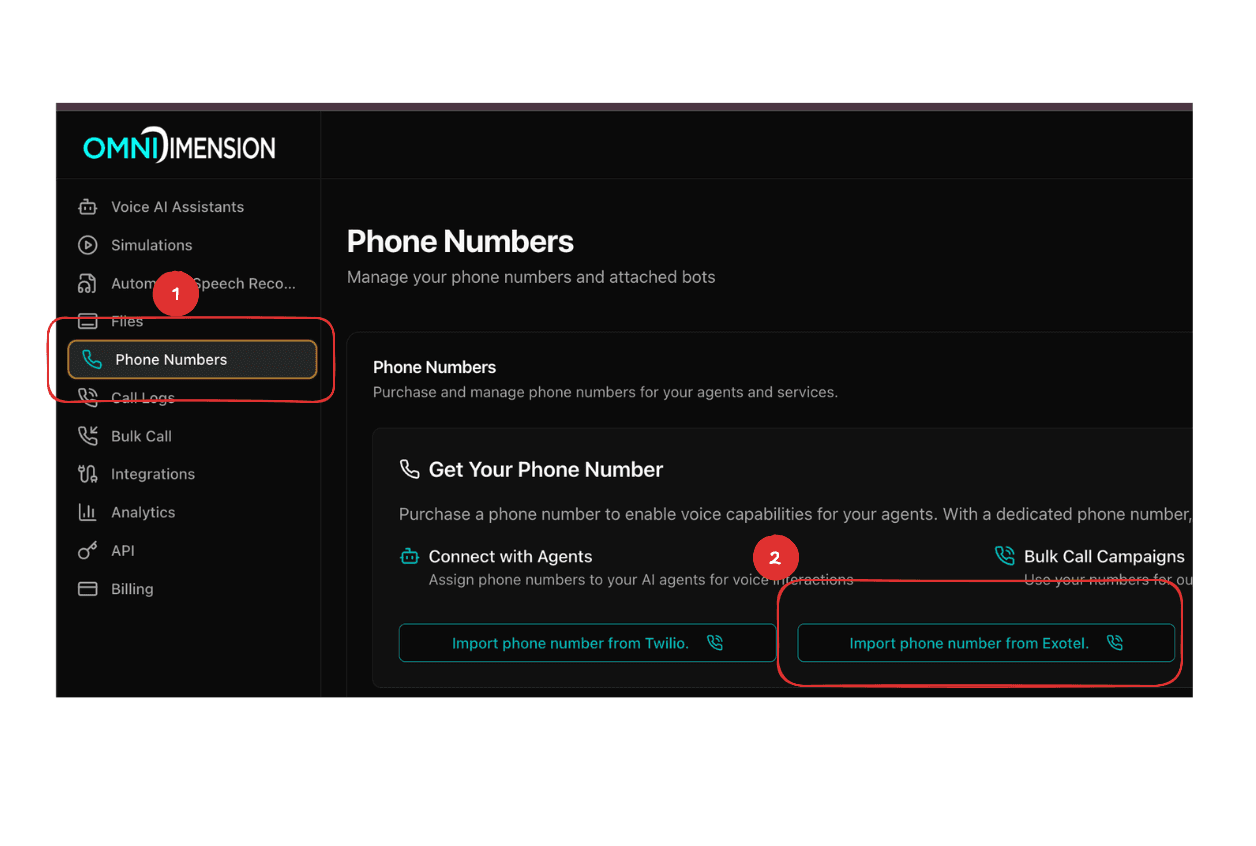
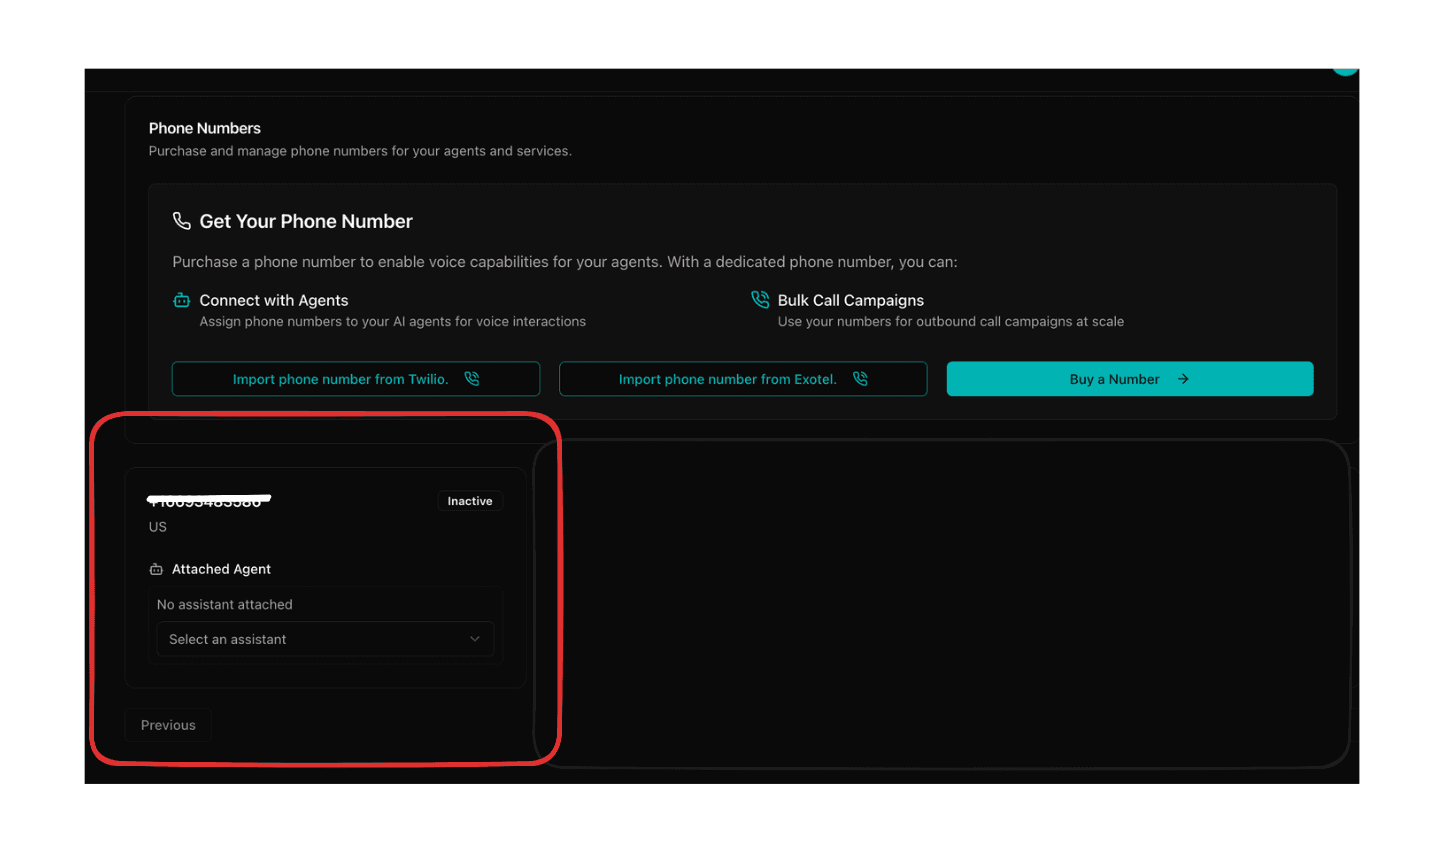
6.1 Navigate to Phone Numbers
In your OmniDimension dashboard, go to the 'Phone Numbers' section from the main navigation menu.
Navigate to Phone Numbers in your dashboard

6.2 Click Import Exotel Phone Number
Look for the 'Import Exotel Phone Number' button and click on it to open the import form.
Click the Import Exotel Phone Number button
6.3 Fill in the Import Form
Enter all the credentials you collected from your Exotel dashboard in the form fields:
- Exotel API Key
- Exotel API Token
- Exotel Subdomain
- Exotel Account SID
- Exotel Phone Number
- Exotel App ID (your call flow ID)
Fill in all the required credentials
6.4 Complete the Import
Click the 'Import' button to complete the process. Your Exotel phone number will now appear in your OmniDimension dashboard and be ready for use with your AI agents.
Your phone number is now imported successfully
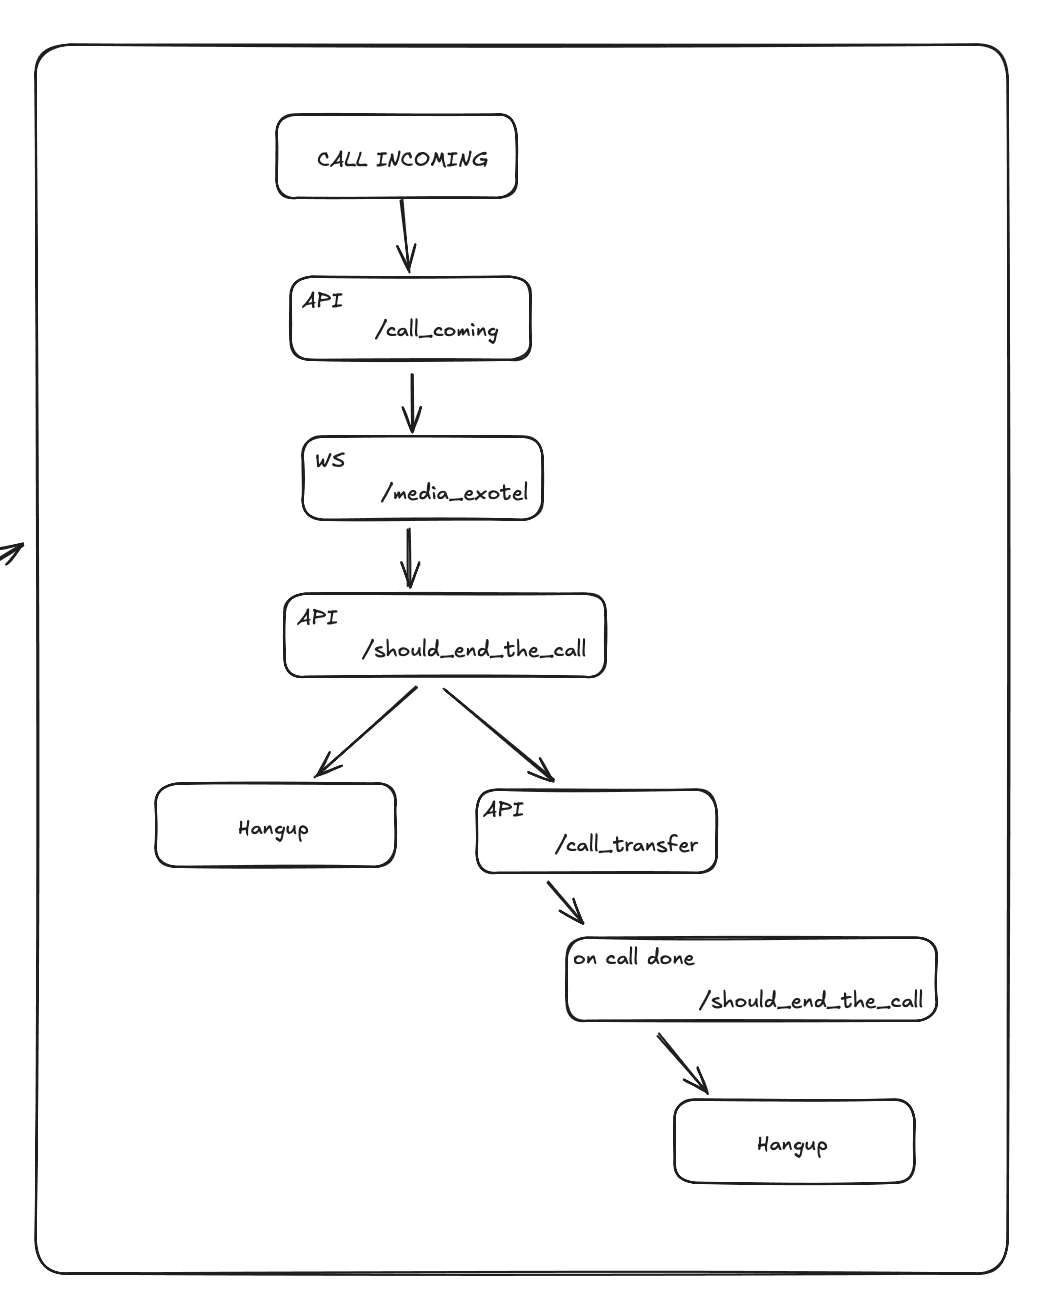
7. Understanding the Call Flow
Here's how your call flow works after setup. When someone calls your Exotel number:
- The call first goes to OmniDimension's call_coming endpoint
- OmniDimension then connects to your AI agent through the voicebot
- Your AI agent handles the conversation
- When the call should end, it goes to the should_end_the_call endpoint
- If a transfer is needed, it goes to the call_transfer endpoint
- All calls eventually end with a hangup action
Complete call flow overview
8. What Happens After Import
Once your phone number is successfully imported, you can:
- Use the phone number with any of your AI agents
- Receive incoming calls that are automatically handled by your agents
- Monitor call logs and performance in your dashboard
9. Next Steps
Now that your Exotel phone number is imported, here are some recommended next steps:
- Configure your AI agents to handle calls effectively
- Attach exotel phone number to your agent
- Test your setup by making a test call to your number
10. Troubleshooting Common Issues
If you encounter any issues during the setup process, here are some common solutions:
- Voicebot applet not visible: Make sure you've completed KYC verification. If still not visible, contact Exotel support
- Import fails: Double-check all credentials are correct and your call flow is properly configured
- Calls not connecting: Verify your call flow URLs are correct and your OmniDimension account is active
- Call hangup on connect: Make sure all URLs are entered exactly as shown with no extra spaces
- KYC issues: Contact Exotel support if you're having trouble with the verification process
11. Getting Help
If you need additional help with the Exotel integration:
- Check the Exotel documentation for detailed call flow setup
- Contact Exotel support for issues with your Exotel account or call flows
- Contact OmniDimension support for issues with the import process or AI agents
- Join our community forums to connect with other users